Thursday, January 31, 2013

Order Glasses Online with GlassesUSA.com


Has anyone ever purchased eye glasses online? For the longest time I didn’t even know that was an option. Then last year my kids broke my glasses (for the second time), I happened to come across an ad online, and decided to give it a shot.

I went to an optometrist to obtain a current prescription and took that information online to order my glasses.

This is where GlassesUSA.com comes in. They offer great prices on frames and lenses, including prescription sunglasses. They also have designer frames at a discount. The prices listed actually include basic lenses. That’s a huge savings over regular stores! Also important is the 100% satisfaction guarantee. (Definitely a must when shopping online.)

At first I was somewhat hesitant to purchase glasses online since I couldn’t see what they would look like on me, but GlassesUSA.com has a solution for that. You can upload a photo of yourself and “try on” the glasses frames! For me that’s even better than trying on glasses in the store since my eyesight is so bad, I can’t see what I look like in a mirror without the prescription lenses!

Right now they’re offering 15% off plus free shipping (on orders over $50 – Just enter code FS15 at checkout) or 10% off any order of prescription eyeglasses (enter code Blog10 at checkout).

I love the glasses I got and of course loved the huge savings, especially during a time when we didn't have insurance. Has anyone else had experience purchasing glasses online?

(This is a sponsored post but the opinions are truly my own.)

Saturday, January 26, 2013

Back to School with Fashion Design

Monday marks the start of a new semester of my schooling.  This time I decided to put aside accounting (at least for the semester) and take a couple of courses in the fashion design program at my college.  I will be taking "History of Fashion" and "Apparel Construction" (it will be focused on industrial construction methods, which I'm excited to learn, and I'm hoping it will help me in my home sewing as well).

Since those topics are along the same lines as my blog, some of my posts between now and the end of May will be devoted to them.  I will try to do an update every week on what we covered in class, if it seems interesting enough to share.  Anyone care to follow along?  If you're interested, here are the books I'm using:


I can't wait to get started!

Thursday, January 17, 2013

Necklace Alteration -- Two from One

Has anyone else discovered the Styled by Tori Spelling line of jewelry?  I really like a lot of the designs, but I've found that using the system as-is makes necklaces that end up being an awkward length, or I would like it to be just a little bit different.  Whenever something like that happens I usually just end up doing what it takes to make it the way I want it.

Take this necklace, for instance.

Cat on a Limb-0658.jpg

I loved the open metal flowers, but personally, I felt like the Y style didn't quite work here. So I decided to take off the dangling part in the middle and make two different necklaces.

I attached the middle portion of the original necklace to a long-ish chain using jump rings and made a closure and extension (like in this post).

Cat on a Limb-0659.jpg

Draped Chain Necklace 9 - Cat on a Limb

I created it in such a way that the flowers would hang to one side of the necklace instead of in the center.

While wearing it I noticed the flowers would twist and turn a lot, so I added another jump ring between the flowers, which helped it stay flat.

Cat on a Limb-0663.jpg

Cat on a Limb-0664.jpg

Cat on a Limb-0665.jpg

For the second necklace I attached a pre-made "necklace top" from the Styled collection, which I shortened to make the center of the necklace lay just below my collar bone.

Cat on a Limb-0662.jpg

Using jewelry wire cutters I clipped the extra loop off of the center flower.

Cat on a Limb-0661.jpg

As you can see it left a couple of barbs sticking out. I used a small rotary tool (kind of like a Dremel, but way cheapy, although it still did the job) and ground them down until it was smooth.

Cat on a Limb-0666.jpg

Cat on a Limb-0667.jpg

Cat on a Limb-0668.jpg

Which gave me my second necklace.

Cat on a Limb-0669.jpg

Two for the price of one... gotta love that! Has anyone else had projects where you were able to get two from one?

-------------------------------------------------------------------
I'll be linking up to these fabulous link parties:

Monday -  Craft o Maniac Monday -- Craftastic Monday --nbsp; Tuesday -  Get Your Craft On -- Sew Cute Tuesday -- Tuesday Talent Show --  Wednesday -  Sugar and Dots -- Your Whims Wednesday -- Create and Share -- Whatever Goes Wednesday --  Linkin’ with Lil’ Luna -- Thursday -  Strut your Stuff Thursday -- Transformation Thursday -- Thrilling Thursday -- Make It Wear It -- The 36th Avenue Party Time -- Friday -  Flaunt it Friday -- Frugal Friday -- Weekend Wander -- Tickled Pink Fridays -- Weekend Wrap-up Party -- Catch as Catch Can -- Friday Flair -- Feature Yourself Friday -- Simply Link {Party} -- Pity Party -- Frugalicious Friday --  Saturday - Strut Your Stuff --  Lovely Crafty Weekend --  Sweet Saturday -- Sunday -  The DIY Showoff Project  Parade --  Sunday Showcase Party -- Creative Bloggers Party -- I Heart Naptime -- Think Pink Sundays

Thursday, January 10, 2013

Fashion Week Highlights - Spring 2013

In the fashion world seasons are a little backwards, or rather, forwards. In the spring designers showcase their lines for that year's fall collections, and in the fall they show their lines for the coming year's spring collections. Although the Spring 2013 Fashion Week happened several months ago, I thought I would hold off commentary until now (the time of year when I start dreaming of warmer weather).

I love how much of the content of Mercedes Benz Fashion Week is posted online after the event. I thoroughly enjoy looking through each collection, or watching highlights from the runway shows. They are not shown completely, but it's a great way to get a feel for each designer.

I admit, I'm fairly picky when it comes to clothing, and I definitely know what I like or don't like, so there are usually only a few looks that stand out to me. Here are some that caught my eye for spring --

These first two images are from Anna Sui.  The first one I love because it reminds me of a vintage sheet.  I have a couple of vintage sheets I'm planning on using to make dresses or skirts at some point.  


The second look I really like for a few reasons.  The pop of orange is great.  My wardrobe is lacking in yellow and orange because those colors don't look very good against my skin.  However, using a print with yellow or orange in it is a great way to incorporate the colors without them being too overpowering or right against the skin.  I love the mix of prints at the hemline, minus the lace leggings.  In general I am not a fan of leggings.


I am totally intrigued by this next dress, by Carmen Marc Valvo.  It's an interesting take on a ruffled, tiered dress, except the tiers are folded flat and are irregular in length.  I think I may use this in some form in the future.


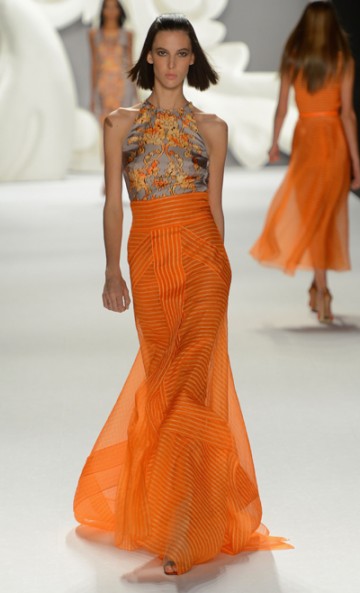
Next up, more orange, this time from Carolina Herrera.  I love the color, although it may be a bit too much for me.  This is probably made from some sort of silk organza, although I could also see it in a sheer cotton gauze.  I love the movement in it.


Here are a couple of solid black numbers from Ralph Lauren.  The first one is a little difficult to see, but it's basically a little black dress with great lines.  It's a faux wrap and while I'm not crazy about the fringe, I love the angles and shirring on the side.


For the second dress I love the structured black lace on the bodice and the flowing, delicate skirt. 


I don't actually know the name of the designer of this next dress.  It was part of the show of students of the Art Institute of NY.  I like the structure and angle of the waistband/belt and the easy flowing-ness of the dress. 


These next two are from Fotini.  I appreciated them for their simplicity.  I love the delicate lace and skinny belt on the first dress.


The second dress is another one that reminds me of a vintage sheet (and I mean it in the best way possible!).


I think I'm a little obsessed with obi belts, because I just can't seem to get enough!  Here's one from Supima (in orange!). 


And finally, I'm going to gush a little bit about a new designer I discovered.  She's been around for a few years now, but this is the first runway show of hers that I've watched.  I love the timeless style of her clothing, and the fact that she uses models that vary widely in age (from teens to 80+ years).  I enjoyed watching an interview with her where she stated that she's disappointed in her generation for their emphasis on disposability, and that clothing should be made to last.  Those are a couple of the things I've been trying to focus on myself.  She also emphasizes gratitude and knowing that she is not doing this by herself.  That's awesome!  Such a relief from the diva attitude that can so easily happen in the fashion industry.  Also, I found a full-length video of her runway show, so if you have 17 minutes to spare, click here to watch it.  Otherwise, see a few of my favorites from her show...


Thank you for joining me for this glimpse at New York Fashion Week Spring 2013!  Now it's just a few more weeks until Fall... in the beginning of February. 

Tuesday, January 8, 2013

Kale Green Smoothie Recipe

I absolutely love whipping up a green smoothie in the morning. It helps me feel energized and ready to tackle the day.

One of my favorite greens to use is curly kale. There are other types of kale, but I've found some of them to be too bitter. In general kale is one of the most nutrient-rich greens around and I've found the bitterness often associated with it is easily masked with bananas.

Cat on a Limb-9899.jpg

Kale Smoothie Recipe

2 large leaves curly kale, main stems removed
2 bananas
1 cup plain yogurt (or non-dairy equivalent)
1 cup milk (or non-dairy equivalent)
honey or other sweetener to taste (it doesn't need much)

Combine all ingredients in a blender and puree until nice and smooth. 

Cat on a Limb-9902.jpg

The great thing about smoothies is that they're totally customizable to your personal preferences. What kind of smoothies do you like to make?

-------------------------------------------------------------------
I'll be linking up to these fabulous link parties:

Monday -  Craft o Maniac Monday -- Craftastic Monday -- Amaze Me Monday -- Make it Great Monday --  Tuesday -  Get Your Craft On -- Sew Cute Tuesday -- Upcycled Awesome -- Tip Me Tuesday -- Tuesday Talent Show --  Wednesday -  Sugar and Dots -- Wallet-Friendly Wednesday -- Create and Share -- Whatever Goes Wednesday --  Linkin’ with Lil’ Luna -- Thursday -  Strut your Stuff Thursday -- Transformation Thursday -- Thrilling Thursday -- Make It Wear It -- Friday -  Remodelaholic Friday -- Flaunt it Friday -- Frugal Friday -- Weekend Wander -- Show and Share Day -- It's Fun to Craft! -- Tickled Pink Fridays -- Weekend Wrap-up Party -- Catch as Catch Can -- Friday Flair -- Feature Yourself Friday -- Simply Link {Party} -- Pity Party -- Design Dazzle --  Saturday - Strut Your Stuff --  Lovely Crafty Weekend --  Sweet Saturday -- Sunday -  The DIY Showoff Project  Parade --  Sunday Showcase Party -- Creative Bloggers Party -- I Heart Naptime -- Think Pink Sundays

Sunday, January 6, 2013

Assembling a 12" Child's Bike

Before I continue on with all the fun posts I have planned, I wanted to finish the assembling of the kids bike (from this post) that I transformed for my daughter.  If you've stumbled across this post looking for how to disassemble a children's bike, just start at the end and work backwards.

Cat on a Limb-Pink Princess Bike


After I painted the bike (using self-etching primer and standard spray paint -- since the more durable metal paints don't come in pink!), I was ready to put things back together.

Tuesday, January 1, 2013

Draped Chain Necklace and Happy 2013!

Happy new year everyone!!  

I, for one, am so happy to have 2012 over and done.  That year was kind of an overall fail for me.  But I've got high hopes and big plans for 2013 which will totally make up for last year.  Some of the plans include a more concerted effort and focus for my blog.  I'm going to focus more on fashion, with patterns, tutorials, style, jewelry, accessories, etc.  It's one of my main areas of interest.  I will also continue posts about food and DIY projects as I love those subjects, too, and don't want to give them up. :)  So, in practice the blog may not end up being very different, but I do plan on posting more frequently and trying to build something that will offer inspiration and help others be successful in their various projects.  And by "they" I really mean you, my wonderful, awesome readers!  Thank you so much for taking the time to visit, leave comments, and support me in my creative journey. 

My first post of 2013 is a tutorial for making a dramatic draped chain necklace.  It was inspired by those long necklaces with large circle links.  I've wanted one of those for a while but each necklace I found in stores was so lightweight and seemed that one tug from a small child would result in a broken necklace.  So, as often happens with things I would like to buy if they were available, but can't find, I ended up making one myself.  Thankfully it ended up being fairly simple. 

Cat on a Limb--2.jpg

NOTE: This tutorial requires some basic working knowledge of how to use jump rings and jewelry-making tools. There are tons of great guides out there for the very new beginner, but I just don't take the time to explain every detail here.

I gathered up a few different types and colors of chain. (Minus that one in the middle... my kids made off with it and I completely forgot about it while I was making the necklace. Haha, I guess "out of sight out of mind" works for me sometimes, too.)

Cat on a Limb-0640.jpg

I started with the two chains made of large circle links. I removed the extra small links on one end (used to connect more than one length of chain) to even them out.

Cat on a Limb-0641.jpg

I laid out the chains to plan the placement, and to make sure they would actually look good together before putting the work in to assemble the necklace. I also took a picture to help me remember how I wanted things to look.

Cat on a Limb-0643.jpg

The large circle chains turned out to be several inches too short for the length I wanted, so I added a couple of inches of regular chain on each side, plus a little extra for an extension, using two jump rings for extra reinforcement to help distribute the weight of the rest of the chains. (At least in my theory, haha)

Cat on a Limb-0646.jpg

Cat on a Limb-0645.jpg

I assembled the closure and added a metal bead dangling at the end of the extension.

Cat on a Limb-0648.jpg

Cat on a Limb-0650.jpg

Cat on a Limb-0651.jpg

Cat on a Limb-0657.jpg

For connecting the chains I started with the smaller circle chain and carefully laid it out so it would lay flat when worn, making sure it wasn't twisted at all. I placed the larger circle chain where I wanted it to connect with the longer chain, then attached it with jump rings.

Cat on a Limb-0642.jpg

After getting the first two connected, I found working on the necklace with it on my dress form helped.

Cat on a Limb-.jpg

Instead of having all the chains go completely around the necklace, I ended them, slightly to the back, securing them on the longer circle chain. I attached them all to one of the circles since it is solid, without a break, so it can't pull apart. For each chain I added, I started by attaching it to the solid circle with a jump ring, bringing it around to the solid circle on the other side of the necklace and adjusted it to the length I wanted.  Then I opened the chain, removed a link to make it that length, and attached it with a jump ring.

For me, the whole necklace, following the bottom chain, measures 33" with 2" extension.  The bottom chain alone measures 26". 

Cat on a Limb-0656.jpg

And all done!

Cat on a Limb--2.jpg

I really love it and I've already worn it more than once. Yay!

-------------------------------------------------------------------
I'll be linking up to these fabulous link parties:

Monday -  Craft o Maniac Monday -- Craftastic Monday -- Amaze Me Monday -- Make it Great Monday --  Tuesday -  Get Your Craft On -- Sew Cute Tuesday -- Upcycled Awesome -- Tip Me Tuesday -- Tuesday Talent Show --  Wednesday -  Sugar and Dots -- Wallet-Friendly Wednesday -- Create and Share -- Whatever Goes Wednesday --  Linkin’ with Lil’ Luna -- Thursday -  Strut your Stuff Thursday -- Transformation Thursday -- Thrilling Thursday -- Make It Wear It -- Friday -  Remodelaholic Friday -- Flaunt it Friday -- Frugal Friday -- Weekend Wander -- Show and Share Day -- It's Fun to Craft! -- Tickled Pink Fridays -- Weekend Wrap-up Party -- Catch as Catch Can -- Friday Flair -- Feature Yourself Friday -- Simply Link {Party} -- Pity Party -- Design Dazzle --  Saturday - Strut Your Stuff --  Lovely Crafty Weekend --  Sweet Saturday -- Sunday -  The DIY Showoff Project  Parade --  Sunday Showcase Party -- Creative Bloggers Party -- I Heart Naptime -- Think Pink Sundays
Related Posts Plugin for WordPress, Blogger...