Thursday, December 20, 2012

Kids Bike Transformation

It took much longer than expected, but I finally finished the project I was working on for my daughter's fourth birthday!  Oh my goodness it feels so good to have it done!  And the icing on the cake is that my daughter LOVES it.

One day while taking my son's bike to get a new tire at the bike shop right around the corner from our apartment, my daughter spotted a tiny pink bike, just her size.  She had a great time riding it around the shop.  At the time she just had a tricycle for herself, which she was quickly outgrowing.  I suddenly had the idea to transform my son's old 12" [black, Batman] bicycle, which was in dire need of a new wheel, into a pink princess bicycle for my daughter. 

Cat on a Limb-Black Batman Bike

When first considering the project I thought it would be fairly straightforward.  Take parts off, take stickers off, spray paint, put parts back on, done.  However, when I got down to the point of having everything off, I got really intimidated and let it sit for a couple days just thinking, "What on earth did I get myself into?"  Thankfully my determination won out and I pushed through to the end. 

Cat on a Limb-.jpg
This is when I started to panic a bit.  (I apologize for the crappy photo)
Cat on a Limb-Pink Princess Bike
Ta da!
Cat on a Limb-0635.jpg

Cat on a Limb-0637.jpg

I'm so happy it turned out so well. Now on to my other 5,378 projects. :)

-------------------------------------------------------------------
I'll be linking up to these fabulous link parties:

Monday -  Craft o Maniac Monday -- Craftastic Monday -- Amaze Me Monday -- Make it Great Monday --  Tuesday -  Get Your Craft On -- Sew Cute Tuesday -- Upcycled Awesome -- Tip Me Tuesday -- Tuesday Talent Show --  Wednesday -  Seven Thrity Three -- Wallet-Friendly Wednesday -- Create and Share -- Whatever Goes Wednesday --  Linkin’ with Lil’ Luna -- Thursday -  Strut your Stuff Thursday -- Transformation Thursday -- Thrilling Thursday -- House of Hepworths -- Friday -  Remodelaholic Friday -- Flaunt it Friday -- Frugal Friday -- Weekend Wander -- Show and Share Day -- It's Fun to Craft! -- Tickled Pink Fridays -- Weekend Wrap-up Party -- Catch as Catch Can -- Friday Flair -- Feature Yourself Friday -- Simply Link {Party} -- Pity Party -- Design Dazzle --  Saturday - Strut Your Stuff --  Lovely Crafty Weekend -- Sunday -  The DIY Showoff Project  Parade --  Sunday Showcase Party -- Creative Bloggers Party -- I Heart Naptime -- Think Pink Sundays

Friday, November 9, 2012

Easiest Dress to Skirt Conversion Ever

It is extremely rare for me to find a dress that fits me with the correct shoulder-to-waist measurement or a maxi skirt that actually reaches the floor (at best they end up being ankle length). Sometimes I am able find a long dress that I can convert into a skirt.

On a trip to a thrift store I found an empire waist dress with a ruched waistband (brand new!). I realized I could simply cut the bodice off at the top of the waistband to make a skirt. It literally took about one minute. I was so happy!  

Cat on a Limb-0524.jpg

Cat on a Limb-0526.jpg

Cat on a Limb-0525.jpg

-------------------------------------------------------------------
I'll be linking up to these fabulous link parties:

Monday -  Craft o Maniac Monday -- Craftastic Monday -- Amaze Me Monday -- Make it Great Monday -- Polly Want 2 Party  --  Tuesday -  Get Your Craft On -- Sew Cute Tuesday -- Upcycled Awesome -- Tip Me Tuesday -- Tuesday Talent Show --  Wednesday -  Seven Thrity Three -- Wallet-Friendly Wednesday -- Create and Share -- Whatever Goes Wednesday --  Linkin’ with Lil’ Luna -- Thursday -  Strut your Stuff Thursday -- Transformation Thursday -- Thrilling Thursday -- House of Hepworths -- Friday -  Remodelaholic Friday -- Flaunt it Friday -- Frugal Friday -- Weekend Wander -- Show and Share Day -- It's Fun to Craft! -- Tickled Pink Fridays -- Weekend Wrap-up Party -- Catch as Catch Can -- Friday Flair -- Feature Yourself Friday -- Simply Link {Party} -- Pity Party -- Design Dazzle --  Saturday - Saturday Spotlight --  Sunday -  The DIY Showoff Project  Parade --  Sunday Showcase Party -- Creative Bloggers Party -- I Heart Naptime -- Think Pink Sundays

Saturday, October 27, 2012

Calendar for the Kids - Free Printables

For some reason many of my most vivid memories from my early years in elementary school center around the "circle time" calendar.  You know, the one with the interchangeable dates, months, seasons, and weather cards.  Remember those?

When my son started home-based public education (via K12.com) I knew I wanted one as part of our daily routine.  I looked around at some of those offered through educational/office supply stores, but they always seemed really gaudy and kind of obnoxious looking (if that makes any sense, ha!).  I wanted something slightly more aesthetically pleasing and customized with only the elements I wanted. 

So I decided to make my own.  The items I purchased were one 20"x30" foam core board, 1/8" and 1/4" chart tape (optional), and self-adhesive velcro.  Materials I had on hand were printer paper and ink, colored cardstock, colored pencils, laminating sheets, a black marker, ribbon, and page protectors.

Cat on a Limb-0298.jpg

I began by using my big metal square to draw the large rectangle for the calendar, one inch in from the left side and one inch up from the bottom. The rectangle measures 15" high x 19.25" wide. Then I marked off measurements for the small interior squares, vertically every 2.5" and horizontally every 2.75", then drew lines across.

Thursday, October 25, 2012

Aqua and Orange Toddler Birthday Party

Lately I've been tending to go pretty low-key for my kids' birthday parties.  Like I said in my other party post, I usually have to do everything solo, so I don't want to wear myself out so much in preparation that I can't enjoy the moment during the party itself.

For my daughter's birthday last year, which was our first year in a small apartment since moving from the house out of state, I decided to have two different gatherings; one for family and one for friends her age.  I decided to just go with colors instead of worrying about a theme, which ended up saving me a lot of time.

I had a few decorations including the über trendy tissue paper pouf thingys (which I totally love).

Cat on a Limb-8481.jpg

For the kids gathering I just had a few snacks for them, pretty-fied water bottles and whole wheat carrot cake cupcakes (which were heavenly, if I do say so myself). I dyed paper doilies and cut them out with a cupcake liner template.

Cat on a Limb-8477.jpg

Cat on a Limb-8674.jpg

For an activity, besides just playing with the toys in my kids' room (which seems to be what they want to do the most), the kids made macaroni necklaces with pasta that I had dyed different colors.

Cat on a Limb-8480.jpg

And finally, as part of the goodie bags I sent them away with some homemade playdough.

Cat on a Limb-8820.jpg

Simple, yet the kids enjoyed it, so I consider it another success. :)

Saturday, October 20, 2012

Is Facebook Showing You Everything You Want to See?

Yes, it is a bit whiny to complain about a service that's offered for free, but I'm going to take a moment to complain about Facebook fan pages.  Did you know that when you like a page, you aren't always shown their posts?  That's even if you want to see them.  In the past Facebook has shown posts to about 40% of fans.  Just recently they changed things again and now only 10-15% fans are seeing posts from the pages they like.  Of course it's based on complicated algorithms that take into account interaction with the posts, but still... So frustrating!  Personally I think it would be nice if they would just default to showing everything and then people could opt out of seeing what they didn't want to see. 

You may have already heard about the way around this, but in case you haven't, here's what you need to do:  (Thanks to the talented people over at MCP Photoshop Actions and Lightroom Presets for this)

Click on the image to enlarge
Hope that helps you stay up to date with all your favorite people and companies!

Saturday, October 13, 2012

Fashion Museum Tour - Information and Inspiration

Have you checked out the website for the Metropolitan Museum of Art?  It's awesome!  There are so many subjects with photographs and historical information, it's almost like a mini trip to the museum.  One of the departments is called The Costume Institute.  They have a lot of photographs of (and background about) clothing from different designers and periods of time.  I love looking at clothing from the past.  It's interesting to see the influence it often has on the clothing of today and how certain shapes and styles repeat themselves throughout history.  If you're interested in clothing and fashion I would definitely suggest going to check it out (the name above is a link).  Here are a few of my favorites:

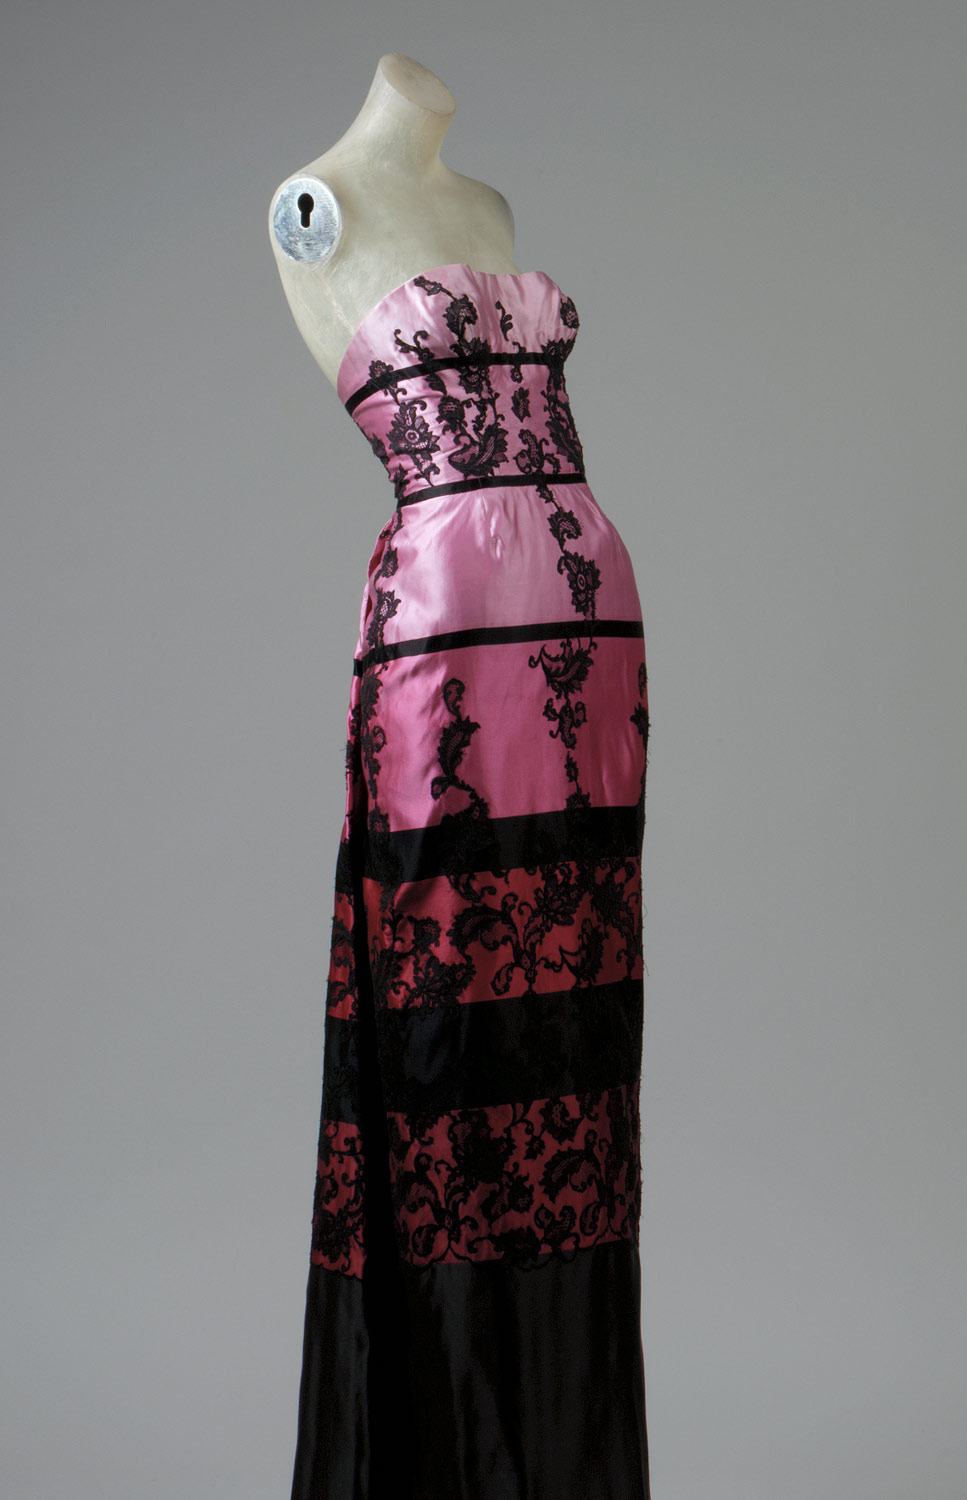
Emilio Schuberth, 1952
The ombre effect is so trendy right now, but here's a beautiful example from the early 50's!

Charles Frederick Worth, 1880s-90s
"Coco" Chanel, 1938
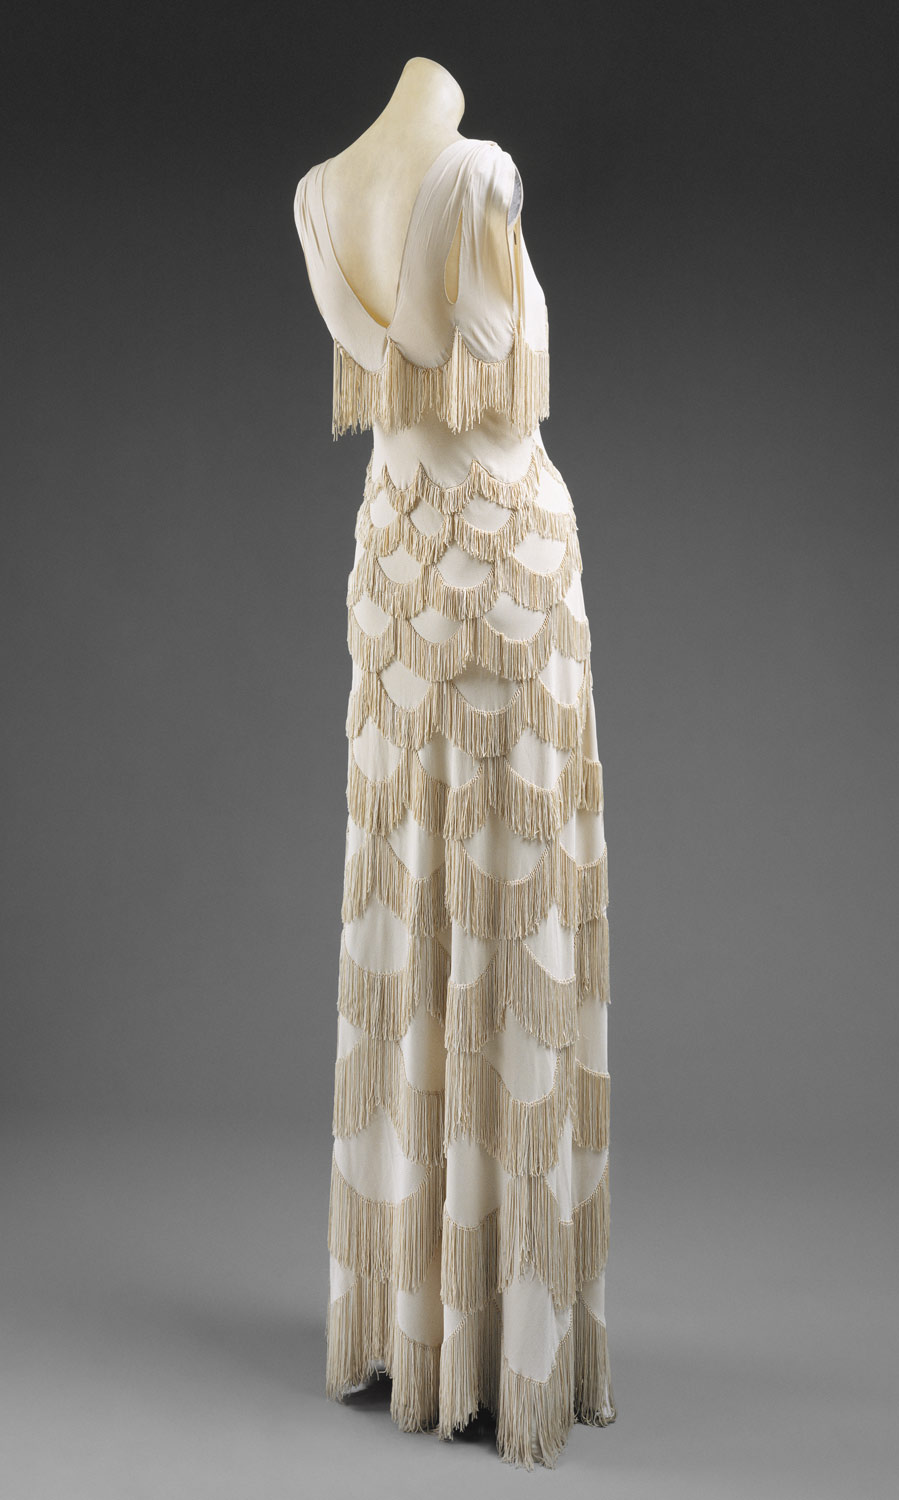
Madeleine Vionne, 1938
Christian Dior, 1949
Tangent: Here's a wedding cake inspired by this dress --
source
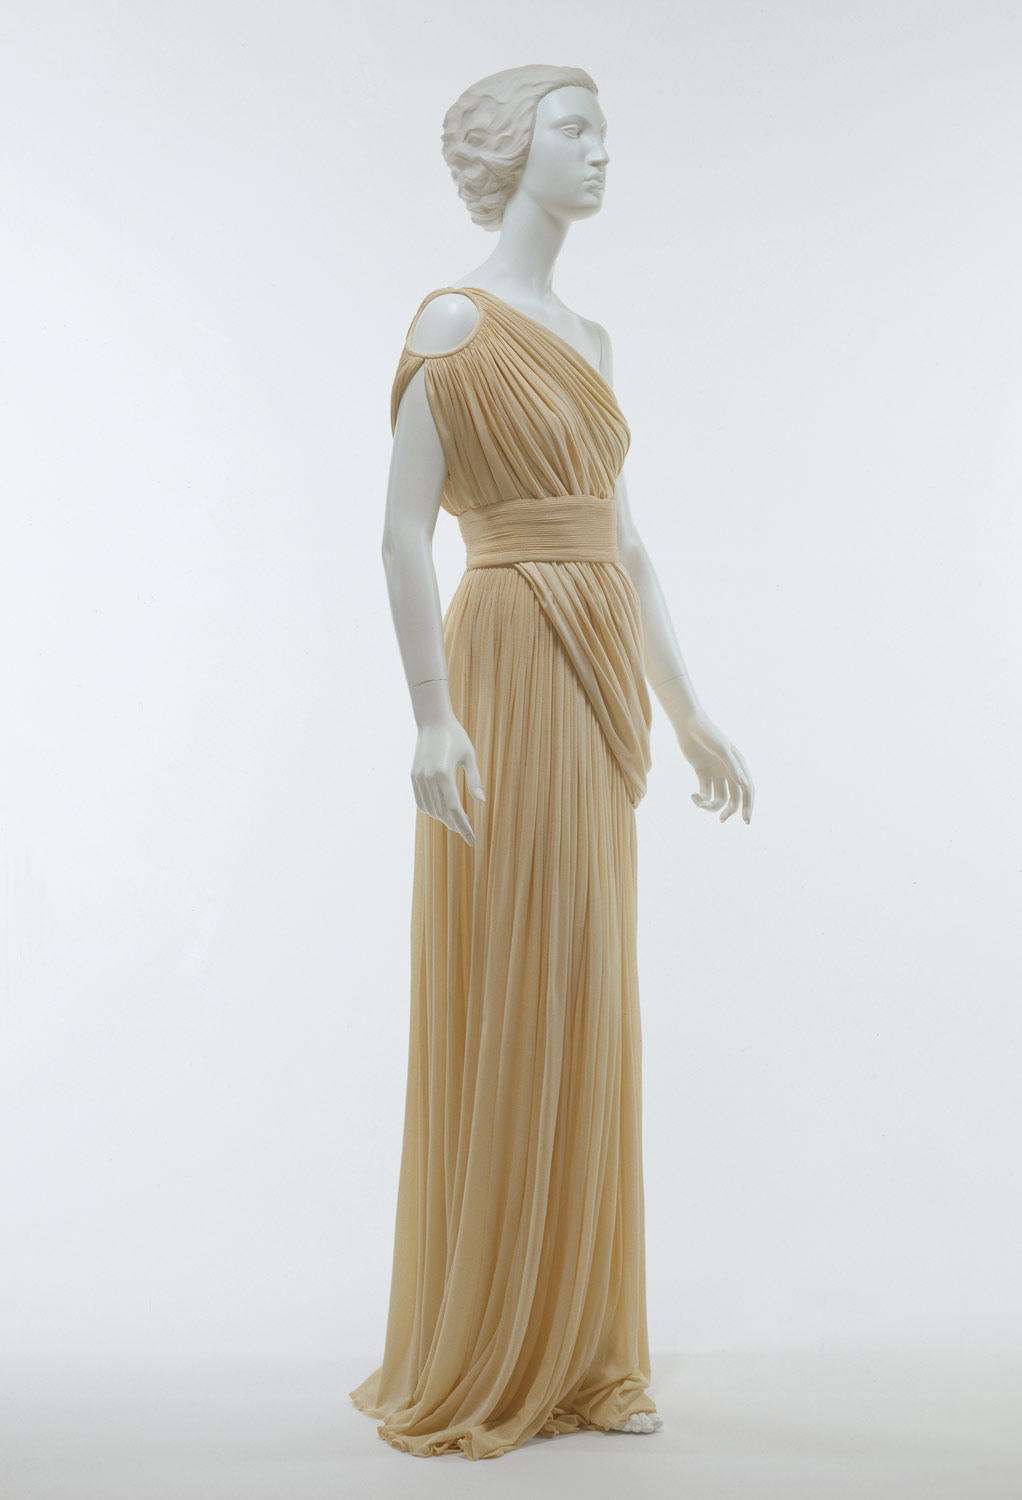
Madame Grès
I hope you enjoyed the little fashion museum tour.  Where do you go to find inspiration (whether for clothing, art, food, or anything else)?

---------------------------------------
I'm linking up to:
While He Was Napping
Thirty Handmade Days 
The 36th Avenue 
Under the Table and Dreaming
My Girlish Whims 

Friday, October 5, 2012

Toddler Puppy Birthday Party

Is everyone excited and getting ready for Halloween? Every day my kids have different ideas about what they want to dress up as, so while I wait for them to make up their minds I thought I would post about some other things.

My daughter's fourth birthday is coming up in November. I'm not sure what I'm going to do this year, but I wanted to share what I did the past two years. I usually have to do everything by myself, so my kids' parties tend to be pretty low-key. Plus, when they're so young I don't feel like it's necessary to go all out.

For my daughter's second birthday I decided on a puppy dog theme, with light pink and lavender as the colors, since she was/is pretty much obsessed with dogs. She loves to pretend she's a dog and has done it since before she could talk.

The invitations were a simple folded cardstock with torn scrapbook paper and a simple silhouette of a dog's head on the front.

Cat on a Limb-1.jpg

I used vinyl paw prints on the walkway and door, with balloons for a little decor outside.

Cat on a Limb-2.jpg

Cat on a Limb-4.jpg

Cat on a Limb-3.jpg
Our [rental] house at the time was a cute 1940s bungalow painted white with yellow shutters.  So fun!

Inside I set up a table with some finger foods for the kids (with more balloons and vinyl paw prints for decoration). We had grapes, string cheese, carrots, cucumbers, olives, homemade graham crackers in the shape of dog bones, and homemade apple chips.

Cat on a Limb-5.jpg

I also added vinyl paw prints to plain white cups.

Cat on a Limb-7.jpg

The cake I made was a two-layer sheet cake (homemade, 100% whole wheat, and tasted great, by the way) that I cut into the shape of a bone and frosted white. (But I won't be posting a photo of it because when I sent my husband to the store to get whipping cream he came home with the canned variety which does NOT work for frosting a cake, just FYI. So, it turned out looking horrible and since I did the cake day of the party instead of the day before like I should have, there was no time to fix it. :)

The party favors consisted of a few dog-themed items in "doggy bags".

Cat on a Limb-.jpg

Cat on a Limb-8.jpg

For activities the kids decorated the dog tags with stick-on jewels and pushed the inflatable balls around an obstacle course using the dog nose/mask. Other than that the kids just wanted to play with toys in my kids' room, and I wasn't about to fight that. :)

All in all it was a good time and my daughter loved it. That's what counts to me.

-----------------------------------
I'll be linking up to these fabulous link parties:

Monday -  Craft o Maniac Monday -- Craftastic Monday -- Amaze Me Monday -- Make it Great Monday -- Polly Want 2 Party  --  Tuesday -  Get Your Craft On -- Sew Cute Tuesday -- Upcycled Awesome -- Tip Me Tuesday -- Tuesday Talent Show --  Wednesday -  Seven Thrity Three -- Wallet-Friendly Wednesday -- Create and Share -- Whatever Goes Wednesday --  Linkin’ with Lil’ Luna -- Thursday -  Strut your Stuff Thursday -- Transformation Thursday -- Thrilling Thursday -- House of Hepworths -- Friday -  Remodelaholic Friday -- Flaunt it Friday -- Frugal Friday -- Weekend Wander -- Show and Share Day -- It's Fun to Craft! -- Tickled Pink Fridays -- Weekend Wrap-up Party -- Catch as Catch Can -- Friday Flair -- Feature Yourself Friday -- Simply Link {Party} -- Pity Party -- Design Dazzle --  Saturday - Saturday Spotlight --  Sunday -  The DIY Showoff Project  Parade --  Sunday Showcase Party -- Creative Bloggers Party -- I Heart Naptime -- Think Pink Sundays

Monday, August 27, 2012

Recovering a Lampshade

Continuing on the same theme as my last post (lamps for my living room), I had two brass lamps I painted a pale blue color.  I had found a lampshade at a thrift store for one of them, but was trying to find a shade to fit the second.  On a trip to Lowe's one day I walked by this:

Cat on a Limb-8268.jpg

For a second I hesitated and thought, "Is that a mistake?" Then I realized it might have something to do with the fabric starting to fall off (which I didn't care about because I was going to replace the fabric anyway). Luckily it was the right shape for my lamp (some other shades I had seen were too short and looked odd with my tall, skinny lamp) and was definitely within my budget!

Cat on a Limb-8270.jpg

I brought it home and pulled off the outer fabric completely. The inner fabric was fine and I decided to leave it that way. When I got the outer fabric off the frame I laid it on top of the new fabric I was going to use and cut out two of the same shape (leaving some extra around the edges for seam allowance and for attaching to the frame).

Cat on a Limb-8272.jpg

After cutting out the two pieces I sewed them together, slipped it onto the lampshade frame and folded up the raw edges along the bottom and top openings, securing with hot glue.

Cat on a Limb-8274.jpg

After gluing I trimmed the excess and glued a strip of bias tape around the inside to cover the raw edge, folding over the end to make a nice, clean finish.

Cat on a Limb-8276.jpg

Cat on a Limb-8278.jpg

Thus completed my second living room lamp!

Cat on a Limb-8828

----------------------------------------------
I'll be linking up to these fabulous link parties:

 Monday -  Craft o Maniac Monday -- Craftastic Monday -- Amaze Me Monday -- Make it Great Monday -- Polly Want 2 Party  --  Tuesday -  Get Your Craft On -- Sew Cute Tuesday -- Upcycled Awesome -- Tip Me Tuesday -- Tuesday Talent Show --  Wednesday -  Seven Thrity Three -- Wallet-Friendly Wednesday -- Create and Share -- Whatever Goes Wednesday --  Linkin’ with Lil’ Luna -- Thursday -  Strut your Stuff Thursday -- Transformation Thursday -- Thrilling Thursday -- House of Hepworths -- Friday -  Remodelaholic Friday -- Flaunt it Friday -- Frugal Friday -- Weekend Wander -- Show and Share Day -- It's Fun to Craft! -- Tickled Pink Fridays -- Weekend Wrap-up Party -- Catch as Catch Can -- Friday Flair -- Feature Yourself Friday -- Simply Link {Party} -- Pity Party -- Design Dazzle --  Saturday - Saturday Spotlight --  Sunday -  The DIY Showoff Project  Parade --  Sunday Showcase Party -- Creative Bloggers Party -- I Heart Naptime -- Think Pink Sundays

Monday, August 6, 2012

Lamp Revamp

Hello! Long time no post, I know. I've started working full time and that has left me with very little time for anything other than work, domestic duties and time with the kids. But yesterday I actually made some time for a creative project and that inspired me to write about one of the projects I did a while back but never posted.

For a while I was frequenting thrift stores, looking for a couple of good lamps for my living room. I wanted two with nice shapes and lines, but not necessarily exactly alike as I would be painting them the same color. (I don't like to be toooo matchy-matchy.) Eventually I found a couple of nice lamps, but wanted to make one of them shorter.

IMG_5933.jpg

See that tall skinny part at the top? I wanted that gone. I knew the lamp was put together in sections and thankfully that was one of them so it could be removed.

I started tearing the thing apart by first removing the socket. (Pulled off the top, lifted out the socket, unscrewed the wire terminals, unscrewed the base and pulled the wires out of it.)

IMG_7355.jpg

(partly I took this photo so I would remember how to put it back together)

I removed the bottom piece of the harp (the thing the lamp shade is attached to) and unscrewed the top part of the lamp base.

IMG_7360.jpg

There was an internal pipe (as with most lamps) that had threads only at the top and bottom. However, removing a portion of the lamp required cutting the pipe shorter (which would leave it without threads on one end), so I ended up having to purchase a replacement pipe and cut that one to the length I needed.

I took apart the sections of the lamp, cleaned, primed, painted and sealed them. Then I put them all back together.

IMG_7366.jpg

Then I re-attached the socket. There are two different wires and two different screws to use to attach them. If you're ever replacing a lightbulb socket just remember this--

Ribbed = Silver
Smooth = Brass

IMG_7367.jpg

I put everything back on in order like so (except with the modified base, of course)-

IMG_7379.jpg

With the addition of a $2 thrift-store lampshade I had my new lamp. Yay!

IMG_7374.jpg

For the second lamp I did the same painting, but altered a lampshade to more closely resemble this lampshade. (I'll post that next.)

Thanks for stopping by! (And I apologize if the sentences seem a bit disjointed and awkward. It is late, and I am very, very tired right now. :) )

----------------------------------------------
I'll be linking up to these fabulous link parties:

 Monday -  Craft o Maniac Monday -- Craftastic Monday -- Amaze Me Monday -- Make it Great Monday -- Polly Want 2 Party  --  Tuesday -  Get Your Craft On -- Sew Cute Tuesday -- Upcycled Awesome -- Tip Me Tuesday -- Tuesday Talent Show --  Wednesday -  Seven Thrity Three -- Wallet-Friendly Wednesday -- Create and Share -- Whatever Goes Wednesday --  Linkin’ with Lil’ Luna -- Thursday -  Strut your Stuff Thursday -- Transformation Thursday -- Thrilling Thursday -- House of Hepworths -- Friday -  Remodelaholic Friday -- Flaunt it Friday -- Frugal Friday -- Weekend Wander -- Show and Share Day -- It's Fun to Craft! -- Tickled Pink Fridays -- Weekend Wrap-up Party -- Catch as Catch Can -- Friday Flair -- Feature Yourself Friday -- Simply Link {Party} -- Pity Party -- Design Dazzle --  Saturday - Saturday Spotlight --  Sunday -  The DIY Showoff Project  Parade --  Sunday Showcase Party -- Creative Bloggers Party -- I Heart Naptime -- Think Pink Sundays

Tuesday, July 17, 2012

Today at Crafting in My Closet

Hi everyone!

I'm guest posting today over at Crafting in My Closet.  My good friend Teresa (who has been my friend since before either of us were married and just so happens to be an awesomely talented seamstress) is putting on a great series all about summer fun with kids.  My post is about making puzzles -- something my kids can't seem to get enough of!

Click HERE to go check it out!

Cat on a Limb-9939.jpg

Sunday, June 17, 2012

Whole Wheat Blueberry Muffins

A couple days ago I walked into my local health food store where there was a huge tower of clam-shell containers of fresh blueberries.  They were a 1 pint size (about 2 cups) for $2.  $2?!  For a moment I was tempted to go crazy and buy about 15 containers (almost), but I'm a fairly reasonable person, so I bought two.

One of the ideas that immediately popped into my head was blueberry muffins.  I had only used frozen blueberries before, so I wanted to make them again using fresh berries.  Seriously, no contest, I love the muffins with fresh berries much more than frozen.  I found a great recipe and altered it in my usual way, plus I upped the lemon content a bit, and used rice milk in place of cow milk.

I actually forgot to preheat the oven, so the topping melted into the main part of muffins more than it would have normally, but I don't want to go buy more blueberries just to make more muffins to get the photo "just right".  :)  Even if not picture perfect, they were very delicious!

Cat on a Limb-9921.jpg


Whole Wheat Blueberry Muffins
(adapted  from http://allrecipes.com/Recipe/Streusel-Topped-Blueberry-Muffins/Detail.aspx)
Makes 12 muffins

2 c whole wheat pastry flour
2 t baking powder
1/2 t salt
1/2 c butter, softened
3/4 c sucanat (or Rapadura)
2 eggs
1 t vanilla extract
2 t lemon zest
1 T lemon juice
1/2 c milk (or equivalent)
1 1/2 c fresh blueberries

2 T whole wheat pastry flour
4 T sucanat (or Rapadura)
1 1/2 t cinnamon
2 T butter, chilled

Preheat oven to 375 degrees F. Grease 12 muffin cups or line with paper muffin cups. In small bowl combine 2 tablespoons flour, 4 tablespoons sugar, and 1 1/2 teaspoons cinnamon. Cut in 2 tablespoons chilled butter with fork or pastry blender until mixture resembles coarse crumbs and set aside. Combine 2 cups flour, 2 teaspoons baking powder, and 1/2 teaspoon salt in medium bowl. In large bowl beat 1/2 cup butter with 3/4 cup sugar until light and fluffy. Beat in eggs, and stir in vanilla, lemon zest, lemon juice, and milk. Gradually add dry ingredients, stirring gently. Fold in blueberries. Spoon batter into prepared cups. Sprinkle butter crumb mixture over batter in muffin cups. Bake 20-25 minutes, or until a toothpick inserted into the center of a muffin comes out clean. Cool in pans on a wire rack. Enjoy!

Cat on a Limb-9915.jpg


Cat on a Limb-9924.jpg


------------------------------------------------------------------

I'll be linking up to:

Sunday Showcase Party

Wednesday, May 9, 2012

An Awesome Song

While doing a few minutes of browsing around on YouTube I stumbled across this song.  Why do I love it so much?  Yes the video is adorable and the music is fun, but that's not why.  It's because of this line:

"And if you were addicted to fabric, well you could fill a whole room in our house." 

That brought a huge smile to my face during a sleepless night!  

(As some of you know, I may or may not be addicted to fabric.  Although in my defense I have not purchased fabric, other than to make gifts which have long since been made and given, for over a year.  I haven't even used a gift card I was given to fabric.com!  So maybe I'm becoming a recovering addict.  Maybe.)

I hope you all enjoy the song as much as I did!


And now with modified movie lines popping into my mind ("Fabric is my favorite"), it's time to try to get back to sleep!

Thursday, April 19, 2012

Whole Wheat Neapolitan Cookies -- with Fresh Raspberries

On my birthday, in December, I decided to experiment a bit in the kitchen.  One of my favorite memories from childhood is my grandmother's Neapolitan cookies, which for some reason she only made around Christmas time (along with many other varieties of cookies). 

I didn't have my grandmother's original recipe, so I searched online until I found one (referenced below) to modify.  Of course I wanted to make them whole wheat, but I also wanted to make the layers different flavors instead of just chocolate and "almond" flavor, as well as avoid using food coloring.  By the way, I really don't like almond extract.  Yuck.  Anyway, so I decided to make the pink layer naturally colored and flavored with fresh raspberries.  Thankfully my experiment was successful the first time around, and boy were they good!  (In my opinion, anyway)

You may have to tweak it a little depending on your altitude and humidity.  I hope you enjoy!

Cat on a Limb-8872.jpg


Whole Wheat Neapolitan Cookies
(adapted from http://allrecipes.com/Recipe/neapolitan-cookies-i/Detail.aspx)
Makes almost 72 if you measure exactly

All three layers (hand beat together and divide three ways):
     1 egg
     1/2 t salt

Raspberry layer:
     1/3 c butter, softened
     1/2 c white sugar or xylitol
     1/2 c fresh raspberries, measured then pureed
     1 1/3 c whole wheat pastry flour
     1/2 t baking powder

Vanilla layer:
     1/3 c butter, softened
     1/2 c white sugar or xylitol
     1/2 t vanilla extract
     1/2 c + 1/3 c whole wheat pastry flour
     1/2 t baking powder

Chocolate layer:
     1/3 c butter, softened
     1/2 c succanat/rapadura
     1/2 t vanilla extract
     1 c whole wheat pastry flour
     1/2 t baking powder
     1 1/2 oz unsweetened chocolate, melted

In three separate small bowls, cream together butter and sugar for each layer.  Stir 1/3 of the egg and salt mixture in each bowl, and vanilla for the chocolate and vanilla layers.  Stir in pureed raspberries for the raspberry layer.  Add flour and baking powder to each bowl and stir until well blended.  Mix in melted chocolate for chocolate layer.

Line a 9x5 loaf pan with waxed paper.  Spread chocolate layer evenly on the bottom of the pan, spread vanilla layer over the chocolate layer and top with the raspberry layer.  Cover with waxed paper and refrigerate until firm, about 4 hours.

Preheat oven to 350 degrees F.  Turn out chilled dough and remove waxed paper.  With a sharp knife cut dough lengthwise in half, then cut width-wise into 1/4 inch thick slices.  Place slices on a cookie sheet lined with parchment paper about one inch apart.  Bake 10-12 minutes until lightly browned.  Let cool in the pan for two minutes then place on wire racks to finish cooling.
Related Posts Plugin for WordPress, Blogger...